Monday, January 28, 2013

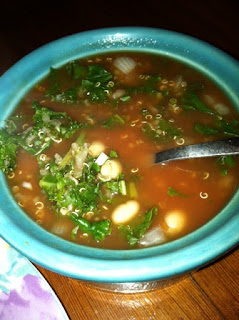
Kale White Bean Soup

All of these cold days have had me on a roll with my Crockpot, and this savory soup was the perfect healthy "warm-up" I needed! It was SO simple to make and tastes great as leftovers- I always mention this because I am always cooking for just myself, so it is important to me that it freezes well and still tastes great :)
warm, simple, yummy
Ingredients:
3 14-ounce cans Vegetable Broth
1 15-ounce can Tomato Puree
1 15-ounce can Small White Beans: drain & rinse
1/2 cup uncooked brown rice
1/2 cup chopped onion
1 t. dried basil
1/4 t. salt
1/4 t. pepper
2 garlic cloves, chopped
8 cups coarsely chopped fresh Kale or Spinach leaves
Parmesan Cheese- finely shredded
mmmm garlic :)
My Alterations: I couldn't find cans of vegetable broth, so I used 1 1/2 boxes of it (I aimed for the 42oz total). You can also substitute Great Northern Beans with the Small White Beans if that is what you have in your cabinet! I did not use Parm Cheese to top it. Lastly, I substituted the Brown Rice with Quinoa that was already cooked... not sure if this messed up the recipe, but I thought it tasted fine! I've been on a Quinoa kick (yay protein) and had no brown rice on hand :)
mmmm onion :)
Directions:
1. In a 4-Quart slow cooker, combine the vegetable borth, tomato puree, beans, rice, onion, basil, salt, pepper, and garlic.
2. Cover, cook on low-heat setting for 5-7 hours OR high-heat setting for 2 1/2- 3 1/2 hours.
3. Just before serving, stir in the kale or spinach and sprinkle with Parmesan cheese
kale= SO good for you!
Clearly, this soup was SO simple to make. I started it at 3 in the afternoon and enjoyed it at 630/7pm, it worked so well. Initially (before adding the kale) I thought the soup looked SO boring and empty, which I thought could be from my cooked-quinoa substitute (maybe the rice was supposed to soak up some of the broth?). After adding the kale, it looked much prettier!
Nutrition Per Serving (6 servings): 150 calories, 9g protein (more with quinoa), 31g carbs, 3g fat (with parm), 8g fiber

Kale's benefits are plentiful! First of all, it is packed with fiber which helps to keep you feel "fuller for longer". 5 grams are in ONE cup... there are 8 cups in here. Don't forget to drink lots of water when you consume fiber (otherwise it will have opposite effects and "bind" you up...) It is super beneficial for your immune system (fight that flu!) with its Vitamins A & C! It even prevents wrinkles, helps your skin, hair, and nails, AND helps keep your vision and bones strong. Plus, it doesn't really taste like anything, especially when combined in soup. So why wouldn't you eat it?

I hope you enjoy!
Morgan

Saturday, January 26, 2013

My Heaven= Protein Shakes


If you follow me on Instagram (morganberg14) you would have seen my brief post about how OBSESSED I am with my protein shakes. My new “creation” has gotten me even more excited about them, so I figured I’d share my secret. (Isn’t my life insanely exciting? Haha)
pure bliss
As you know, I totally love Muscle Milk. I was so afraid to try it at first (about a year ago) because I didn’t want to “bulk up.” Last year, I only knew guys that drank Muscle Milk, but boyyy has that changed this year! All of my pageant friends drink Muscle Milk, hence how I was persuaded into trying it. Let me tell you: this was life changing. My tastebuds have never been happier. After a year of enjoying it after workouts, I am clearly not “bulky” and still have tons of toning to do! Therefore, do not be afraid as I was!
fav flav!

Typically, I toss around 3/4c. water, 5 ice cubes, and 1 scoop of Muscle Milk into the blender. It isn’t chalky at all, and was my version of “dessert” every day. It honestly tastes like a milkshake! I order mine from GNC.com for around $28 per jug- with 35 scoops in each jug, I'd say this is a great deal (cheaper than a daily Chobani or protein bar!)

But now…. It tastes even more heavenly. My friend Steph suggested tossing in a half frozen banana into it. I thought this sounded weird at first, but it is so delicious! It makes it creamy, and Dairy-Queen-Milkshake-style. Usually, I put the first half of my “daily-banana” into my unsweetened oatmeal for breakfast, and the other half goes sliced-up into the freezer for my post-workout protein shake!
thick, milkshake, protein, heaven
 You can definitely switch up these ingredients (I experiment every day) but this will surely satisfy your tastebuds... and sweet tooth!

2/3c. Unsweetened Almond Milk 
1/2 Frozen Banana
1 serving Nonfat Plain Greek Yogurt
1 scoop Muscle Milk
1 T. Unsweetened Cocoa Powder
2 Ice Cubes
I added in the cocoa powder because I have been craving chocolate and love a banana-chocolate combo. Plus, it only adds 10 calories and 0 grams of sugar. HECK YES. Throw it all in the blender with the ice cubes and frozen banana on the bottom, and add more or less almond milk as needed (depending how thick you like it). If it isn’t sweet enough for you, try adding ½ t. Truvia for an actual sweetener with no calories (NO SPLENDA). This has been the only way I’ve found I can tolerate the plain non-fat greek yogurt. Mixing it with the banana and Muscle Milk definitely covered up the taste of the bitter plain greek yogurt… yet it added 17g of PROTEIN! Yay!
I have been using the graham cracker muscle milk, but you truly can use any flavor! You could add some all-natural peanut butter, cinnamon, or try it without the cocoa powder. Mix it up! Today I didn’t have any greek yogurt, so I just did the Muscle Milk, Almond Milk, Banana, and Ice Cubes. It worked fine without yogurt!
 340 calories, 8g fat, 33g carbs, 16g sugar, 36g protein

Have fun, and get ready to enter Heaven on Earth!
Morgan

Wednesday, January 23, 2013

White Bean Chicken Chili


On a cold winter day, this is the perfect (and easiest) recipe to make! No need to chop anything and you can prep it in the morning and let it simmer all day, or whip it up and eat it an hour or two later! I am all about convenience when it comes to healthy eating, especially with a busy lifestyle. Half the reason I write this blog is to prove to BUSY people that healthy eating is SO simple!
SO much goodness <3
The only downfall to making my long-desired chili was the fact that I had to carry my 12lb. new Crockpot home… over a mile. After an arm workout. But hey, like I always say: turn a negative into a positive! YAY for a 2nd workout of the day (and YAY that I can now make chili any day I please since I finally bought my beloved Crockpot). Enough of my sob story- let’s make some chili! 

If this isn’t easy, I don’t know what is. What you will need:
4-5 Chicken Breasts
2 Cans Pinto Beans
2 Can Great Northern Beans
2 Cans Rotel (green chiles/tomatoes)
1 Chili Packet
Crockpot or Large Pot
doesn't get much more simple than this
Begin by boiling a large pot of water. Once boiling, gently place the chicken breasts in the water, allowing them to cook for about 10-15 minutes. You may notice a little froth gathering on top of the water while the breasts are cooking- just swipe this off, it is fat! When I think they are ready, I slice a breast in half just to verify that it is fully cooked!
 Meanwhile, get started with your beans. You can truly use any beans you want- I just enjoy this “white bean” chili that my mom always makes… reminds me of home! Opt for "low sodium" beans whenever possible- I can't always find them, but with all of the canned products going in this recipe, the sodium tends to skyrocket! Open all of your cans, DO NOT DRAIN them, and dump all 6 of them in your Crockpot. Empty your chili packet in.
 When the chicken is cooked, take 2 forks and shred the chicken into small pieces. This is the only “work” that goes into this recipe. Add the shredded chicken to your Crockpot and let the chili simmer on low, stirring occasionally (if you intend on eating it later in the day). If you are hungry and ready to eat, turn it on high until the contents are warm! I enjoy letting all of the flavors seep together throughout the day :)
shred your chicken!
My mom stirs in a small amount of sour cream and serves it with shredded cheese on top. This is delicious, but I choose not to do this… Health freak over here!
finished product :)
 That is it! This recipe packs tons of protein and fiber for limited fat: When this batch is divided into 6 servings, each portion consists of: 
299 Calories
<1 g. Fat
1,147mg Sodium
45g. Carbohydrates
2.5g. Sugar
24g. Protein
17g. Fiber
snuggle up and stay warm!
 Like most of my recipes, this makes great leftovers! Divide out your leftover chili into individual servings in Tupperware, and toss them in the freezer. Take out a serving and put it into the fridge the night before you want to enjoy it again! 

Enjoy this simple recipe!
Morgan

Monday, January 21, 2013

Pure Barre

I have wanted to try Pure Barre for months now, and finally got to experience it this week, thanks to an awesome Groupon deal I bought last month! The only information I got before going into the class was "it is a great workout," "you will love it since you are a dancer," and "my legs were shaking like crazy," so I really had no idea what to expect! If you're in the same boat, here's my little run down of Pure Barre!
the cute little balls
Upon arrival to the class, which was filled with only women, we grabbed a set of 2lb. weights, a small little ball (reminded me of the balls we used at recess back in the day to play for square, but smaller), and a band. Ballet barres lined the room (hence why it's called "barre" I assume) and we were instructed to wear socks only.
Pure Barre Boston
We started the class in "centre," or in non-dancer terms, in the middle of the floor. Our awesome instructor Fiona kicked off the class by killing our abs, warming up our core and body. I was sweating ten minutes in! I immediately wished I hadn't done spinning the day before, haha! During the whole class you do small pulses- contracting your hips under your body while keeping your core firm. Fiona switched up the tempo of the "pulses" to go with the beats of the upbeat, fun songs. Honestly- every move was SO simple- I really believe anyone could do this class! You don't need to be coordinated, flexible, don't need crazy stamina, or any dance experience at all!
We shifted to the barre, used the little ball in between our upper thighs while doing series of pliés/squats on your tip toes targeting the entire lower body. Honestly, my legs were QUIVERING like I've never seen before! I used to be a ballerina, love to workout, and consider myself in decent shape, so the whole time I was thinking "what is wrong with me!" Fiona kept telling us "embrace the shaking in your legs- this is your body changing!" so that totally motivated me to continue giving it my all. It is so great to switch up your exercise routine and confuse your body! Clearly, that's what happened to me today and I loved every second of it.
2 lbs. is deceiving
 We used the 2lb. weights to exercise every muscle in our arms and upper body... And although they are only 2lbs, WOW did I feel the burn! This was followed by girl push-ups (still to the beat of the songs), worked our love handles/hips, glutes.... I left wondering what body part we didn't work- I'm pretty sure we hit them all! Woohoo!
Pure Barre- Newbury St. Love this location!
The whole class reminded me of a fusion between Pilates and a total body conditioning class, but very simple. It was definitely a different workout than I'm used to, as I wasn't dripping sweat like I do when I run- it was more of a "lift, tone, and burn" workout as Fiona said. She was dead on! Besides the 2lb. dumbbells for arms, we used the weight of our own body for everything else.

So, what are you waiting for? Try something new, and I have a strong feeling you will enjoy Pure Barre! I found a 3-session deal on Groupon/Gilt for like $30... keep your eyes peeled!

Have fun and feel the burn!
Morgan

Saturday, January 19, 2013

Southwestern-Stuffed Peppers

I am always stoked to try new healthy recipes, and this one was so good that I had to share! (Thank you instagramfitness for sharing this recipe!) Speaking of instagram- follow me (morganberg14) for some daily motivation :)

Okay, back to the delicious peppers! The original recipe called for brown rice, which I chose to substitute with quinoa since it is packed with protein and deliciousness! This was my first time making it and it turned out delicious! Just beware- 2 cups of uncooked quinoa turns into like... 5 cups cooked quinoa (the recipe only calls for 2 c. cooked, so I have TONS of leftovers). Lesson learned. I also used closer to 3/4lb. ground turkey breast (make sure you get turkey breast, otherwise it is mixed with white and dark turkey meat). You could even cook another pepper (5 total?), as I had a good amount of leftover "mix".

Southwestern Stuffed Peppers 
Ingredients:
-Extra Virgin Olive Oil
-1/2 lb. Lean Ground Turkey Breast
-1 c. chopped onions
-1 T. Low-Sodium Taco Seasoning
-16 oz. Jar of Salsa
-2 c. cooked brown rice (or quinoa)
-3-4 Bell Peppers
-1 can Black Beans drained
-1/2 c. Corn
-Shredded cheese (I omitted this)

Directions:
-Preheat the oven to 400 degrees. Cut the peppers in half, cut the membranes out, and lightly coat the peppers with olive oil and roast in a baking dish (9x13 worked great for 4 peppers) for 20-25 minutes (until cooked through). Remove from the oven and allow them to cool so you can handle them.
-While the peppers are roasting, cook your ground turkey and onions. Also cook/boil your quinoa or rice! Add cooked rice, black beans, corn, cooked meat, taco seasoning, and salsa into a bowl and mix.
-Spoon mixture into each half of the peppers, put them back in the baking dish, and bake for another 15-20 minutes. If you are adding cheese on top (I did not), sprinkle the top with shredded cheese right before removing from the oven!
Now, ENJOY!
How mine came out :)
These were so easy to make, and still tasted great as leftovers! I wouldn't do anything to change the recipe. Everything in them is so healthy, you can't feel guilty about eating these for one second. Can't wait to make them again!

Morgan

Wednesday, January 16, 2013

The "Eat Clean" Philosophy & Snack Time!

My favorite time of the day: snack time. I mean, who doesn't love snack time? Lately I've been doing a bit of "research" as I needed to switch up the foods I've been eating... Eating the same 10 things every day gets a little old, so I found some new healthy snacks! I figured it this would tie in well with my "eat clean" blog post, so here we go!
New Fav Snack... we will get to this in a few :)
Many people are transitioning to the "Eat Clean" lifestyle which translates to ingesting natural, whole foods (vegetables, fruits, complex carbohydrates, lean proteins), and avoiding junk food, sugar, and processed items as much as possible. I found an awesome quote depicting the "eat clean" philosophy: "if it is man made, don't eat it." This would include white breads, candy... things you wouldn't find in nature. Kind of gross to think about.
First of all, lets talk about peanut butter. Who doesn't love peanut butter? What many people don't know (including me, until now) is that PB is packed with sugars and oils. No wonder why it tastes so good. When looking at the ingredient list of my 'Reduced Fat Skippy Peanut Buter,' there is a laundry list of ingredients... eww. Our bodies don't need all of those extra ingredients! Lesson learned: the ONLY ingredient that should be on your peanut butter jar.... is peanuts. Pretty self-explanatory, huh? So, I found myself a new peanut butter: Teddie! :)

It is all natural, the ONLY ingredient is peanuts, it is the SAME price as your regular Skippy of Jif, and it honestly tastes good! Now, it doesn't taste super sugary (duh), it tastes like... chewed up peanuts. Added bonus: there is zero sodium. None! Compared to the 160mg of sodium in my Skippy. (Teddie also has half the carbs and only 1g of natural sugar). So what it your excuse to not buy this instead?

Next up- Rice Cakes! I always hear pageant girls talking about rice cakes and I never quite understood why. After all, don't they just taste like air? Well, not when you prepare them the way I do! This is another "clean" food, as the ONLY ingredient is whole grain brown rice. Perfection!
Get the plain, unsalted kind= healthiest. (chocolate is good too...)
So, the PERFECT snack is a combo of your all-natural peanut butter, a rice cake, and a sliced-up banana! You can't get much healthier than that:
Nutrition Facts:
Calories: 221
Fat: 8g
Carbs: 33.5g
Sugar: 12.5g
Protein: 5g
I'd say that is a good, clean snack, as the sugars and carbohydrates are natural from the banana, the fats are "good" fats from the nuts, and a little protein always helps! Another alternative: sprinkle a dust of cinnamon!
35 calories... Haha! Love it!
Chocolate milk. While I've always tried to avoid this because of the sugar content, lately I've been reading articles that explain chocolate milk's strong benefits after a workout! The mixture of the protein content, carbohydrates, calcium, and yes, sugar, will help to restore your body's energy. Plus, it is WAY cheaper than most protein-powders (like my favorite Muscle Milk, which I refuse to give up). This quote sums it up well: 
"This sugar will cause a spike in insulin levels, driving the glucose molecules into the muscle tissue and replenishing the energy stores for your next workout. Without this insulin spike, you’re going to be looking at a slower recovery period, which could mean more time out of the gym."
Tell me that doesn't look heavenly.
 I loved this article- tons of factual, nerdy, health-freak information. Then again maybe I loved it because I could understand it all (thanks, nursing)! Read more detail here: http://www.foxnews.com/health/2011/10/30/benefits-chocolate-milk-after-your-workout/

Remember, eating smaller, more frequent meals is the BEST way to keep your metabolism going throughout the day. I tend to eat 5-6 meals to avoid the rollercoaster your body goes through when you are eating 3 large meals! Chug water all day, and check out the ingredient labels on everything you eat- the fewer items, the better (and obviously more natural!)
I just love ya.
Ready, Set, Eat Clean!
Morgan

Tuesday, January 15, 2013

DIY CrossFit Workout

As I mentioned in my last post, it is time for a CrossFit workout... and YES, you can do it on your own! I'm about to show you how. A few weeks ago, I had the opportunity to attend 2 CrossFit classes as you may have seen on my blog! I got SO much out of this (best workouts of my life) that I decided to take pictures of the whiteboard where the workout is listed... and I have been doing them on my own.
This workout is divided into groups of 4, with a warm up to begin. Before you get started, I suggest setting up all 4 of your stations. This will prevent you from having to interrupt your workout between each set.

You will need:
-jump rope              -dumbbells                       -10lb. plate
-25lb. plate              -TRX ropes or yoga ball   -pull up bar
-box to jump on      -10lb medicine ball           -MOTIVATION

Grab dumbbells according to your fitness level- I am not a huge, buff, muscle machine so I chose 12-15 pounds. You'll be using these for bicep curls, so plan accordingly. "Plates" are the round weights you'd typically put on bars. Use a higher weight if you're more advanced; same goes for the medicine ball!  Most of this can be found in the "studio" of your gym. I honestly gathered all of this stuff from throughout the weight room in my own corner (don't be ashamed... there are plenty of weights to go around, and you're about to dominate. so who cares) to facilitate my workout!
everything you need!
After you have your supplies, you are ready to go! This is how the workout goes: You will repeat each exercise group as many times you can within 9 MINUTES. Set a timer for 9 minutes and repeat the circuit until the timer goes off (timers can be found on your iPod, iPhone, stop watch). It is tough, but allow yourself a few minutes between each set to breatheeee. I'm about to demo/explain each exercise for you. Here we go!

WARM UP
Run 2 Laps (400m total)
10 push-ups
10 sit-ups
10 squats
***Repeat this 4 times***

Alternative to running 2 "laps": run for 1-2 minutes on the treadmill, jumping jacks, high knees, anything to get your heart pumping.
Now begin your 9-Minute rotations:

GROUP A
50 jump ropes
9 Dumbbell Squat Curls
9 & 9 Plate Chops
DB Squat Curls:  1. Squat    2. Bicep curl.  Simple!
Plate Chop: 1. Squat with 10lb. plate on one side
Plate Chop: 2. Stand and 'chop' across body. 
9 Plate chops on EACH side. 18 total. After you have finished the jump rope, DB squat curls, and 18 plate chops.... REPEAT all until the timer goes off. Let the sweat begin. After that timer goes off, breathe, and reset it for Group B!

GROUP B
5 Clapping Push-Ups
9 TRX Rows
9 TRX Atomic Push-Ups
9 Box Jumps
My clapping push-ups turned into normal push-ups after the first round. Don't let yourself stop, if you can't handle it all, modify the workout so that you can! Since I didn't have TRX ropes, I did the "rows" as standing wall push-ups, and used a ball for the atomic push-ups, as shown below.
Atomic Push-Ups: 1. Steady feet on the ball
Atomic Push-Ups: 2. Do a Push-Up
Atomic Push-Ups: 3. Raise your rear as high in the air as you can! Feel the burn in your core!
Complete the circuit with 9 Box Jumps- simply jump up and down on the box 9 times. Repeat all four exercises until your 9-Minute timer goes off!
GROUP C
5 Medicine Ball Volcanos
9 Medicine Ball Burpees
9 & 9 Lateral Lunges
9 Medicine Ball Push-Ups
Volcano: 1. Sit with medicine ball, lean back to lay on ground
Volcano: 2. Bring medicine ball overhead.
Volcano: 3. Sit back up, prepare to stand. Crossing your feet helps!
Volcano: 4. Stand with medicine ball overhead. Sit back down to repeat
 Medicine Ball Burpees:
MB Burpees: 1. Jump with MB overhead
MB Burpees: Complete Burpee as you normally would
Lateral Lunges: Lunge to each side 9 times with Medicine Ball
Lateral Lunges: 9 on each side
And lastly, Medicine Ball Push-Ups... (on the ball... ouch)
MB Push-Ups: 1. Steady yourself on the ball
MB Push-Ups: 2. Push-Up.... Hate these.
YAY! Repeat that until your 9 minutes is up. ONLY ONE CIRCUIT LEFT!!!

GROUP D
Bear Crawl
30 Overhead Plate Lunges
9 Pull-Ups
Bear Crawl up and down the studio or weight room.. whatever you prefer! The plate lunges are demonstrated below, and the pull-ups can be done with assistance. I'll be the first to admit I cannot do a pull-up (yet) so I use the pull-up machine where you can have weighted-assistance. At CrossFit, we used extra thick "rubber-bands" to help us.
Overhead Plate Lunges: Keep the 25lb. plate overhead, alternate legs
Repeat for 9 minutes........ AND YOU ARE DONE!! Toughest 36 minute workout ever? I think yes... but just wait for the next CrossFit workout I post! If you truly plan to attempt this at the gym, I commend you. After all, I wouldn't have spent time coercing my bestie Lisa into taking awkward pictures of me if I didn't hope that at least ONE person would try this! So let me know what you think, PLEASE! I know you can do it.

Thanks for taking the time to read! Check out my Instagram for some daily health motivation: morganberg14

Stay tuned... because I will post the other CrossFit workout eventually! After my delicious-healthy-snack post... SO much to blog about!! :)
Morgan